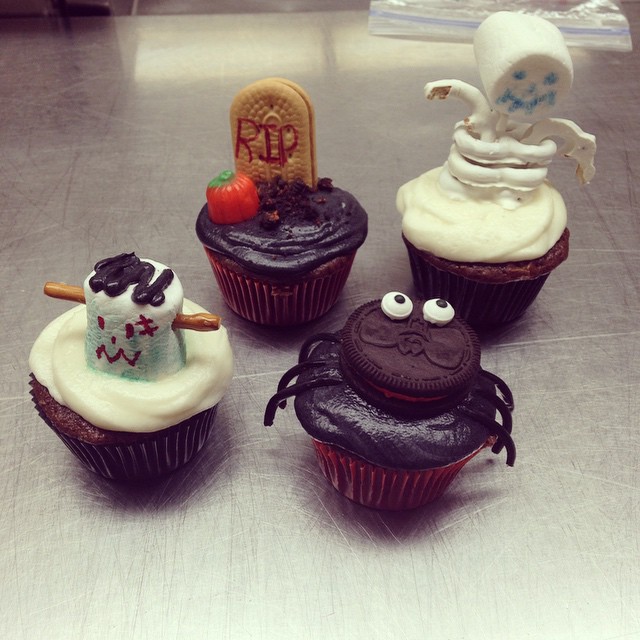
This halloween, get ready to be creative, and not just with your costume! Gather up some supplies, and get ready to impress your friends with these cute little cupcakes. These cupcakes are super easy and fun to make. So take off your witch's hat, put on your chef's hat, and start decorating!
Frankenstein Monster
Supplies: Marshmallows, pretzel sticks, and food decorating pens (found near the cake decorating supplies).
Instructions: Color the marshmallow green and draw in a face, complete with a scar and hair, with food decorating pens. Break the pretzel sticks down to size and insert in the sides for Frank's bolts.
Black Spider
Supplies: Oreo cookies, candy eyes, licorice ropes, and little extra frosting.
Instructions: Apply a small dab of frosting to each candy eye and press onto the cookie. Put cookie on top of frosted cupcake. Peel and cut licorice rope into equal-size pieces for the legs and insert into the frosting, sliding under the cookie. If you feel a need to anatomically correct, include four legs on each side and eight eyes. (Who's going to say 'no' to additional candy eyes?)
Graveyard
Supplies: Vienna Fingers or similarly shaped creme cookies, orange pumpkin candies, chocolate creme cookies, and food decorating pens.
Instructions: The Vienna Fingers serve as a tombstone. Write an appropriate message in the top half to third of the cookie. Insert cookie near the edge of the cupcake, deep enough to keep the cupcake from tipping. Place an orange pumpkin candy on the frosting. Twist open a chocolate creme cookie and scrape off the filling with a butter knife (no licking!). Crumble it into small pieces over the exposed areas of cupcake frosting.
Skeleton
Supplies: Yogurt covered pretzels, white sticks (like those used for cake pops), marshmallows, and food decorating pens.
Instructions: Cut the sticks into 2- to 3-inch pieces and insert into the middle of the cupcake, leaving enough exposed to stack three pretzels and attach a marshmallow head. Place three pretzels on the stick. Add a face to the marshmallow and attach to the stick. Cut a pretzel into pieces to look like arms and fit into the stacked pretzels.
Check out more pictures and explaination at Green Bay Press Gazette

 RSS Feed
